This section provide training manuals and reference guides to support users in completing purchasing processes within Red Dragon Depot at SUNY Cortland.
User Manual
Login Instructions
- Go to myRedDragon login page
- Navigate to Faculty/Staff page
- Click Red Dragon Depot link
- A new window will open
Note: Logging out of Red Dragon Depot does NOT log you out of myRedDragon.
- Order Types
- Punch-Out Catalog
- Redirects to vendor website
- Example: Staples
- Typically P-Card only
- Hosted Catalog
- Items stored within Red Dragon Depot
- Example: Central Stores
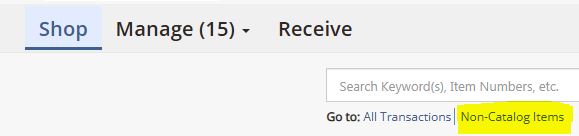
- Non-Catalog
- Use this when a vendor is not part of a catalog (PO only)
- Punch-Out Catalog
- Creating Orders
- Non-Catalog
- Steps:
- Click “Non-Catalog Items”
- Search for supplier
- If not found → contact Purchasing/AP
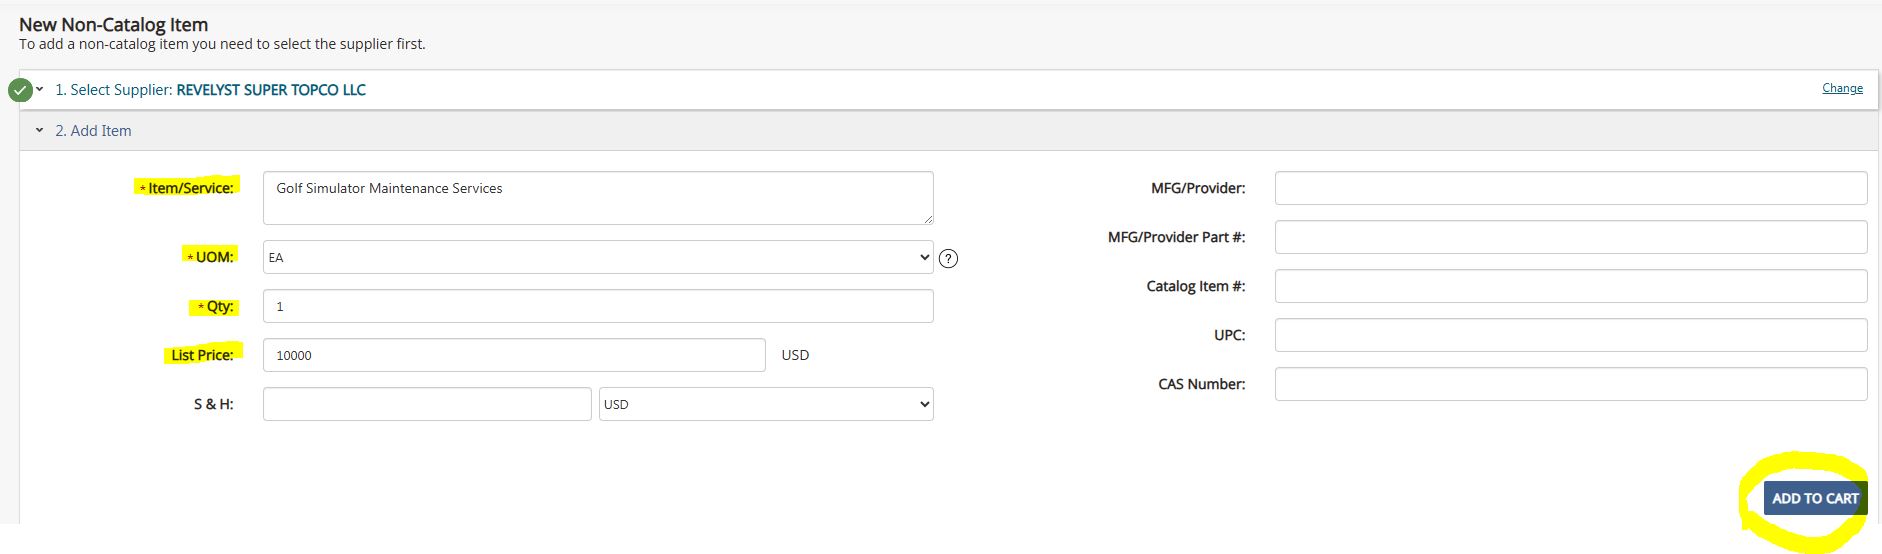
- Select vendor

- Enter Item Details:
- Item/Service: Description
- UOM: Leave as default
- Quantity
- List Price
- Shipping & Handling: Optional
- Click “Add to Cart”
- Click “Non-Catalog Items”
- Steps:
- Hosted & Punch-Out Catalogs
- Hosted Catalog
- Search directly within Red Dragon Depot
- Enter quantity → Add to Cart
- Punch-Out Catalog
- Opens vendor website in new window
- Steps:
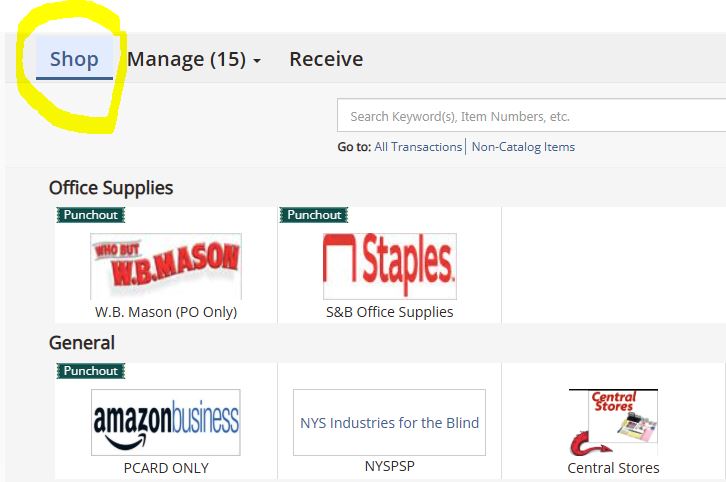
- Click Shop
- Select catalog
- Add items on vendor site
- Click Submit Order
- Return to Red Dragon Depot cart
- Hosted Catalog
- Non-Catalog
- Checking Out
- Convert Cart to Order
- Click Cart
- Review items
- Adjust quantities
- Remove items (red x)
- Click Checkout
- Convert Cart to Order

Transaction Information Sections
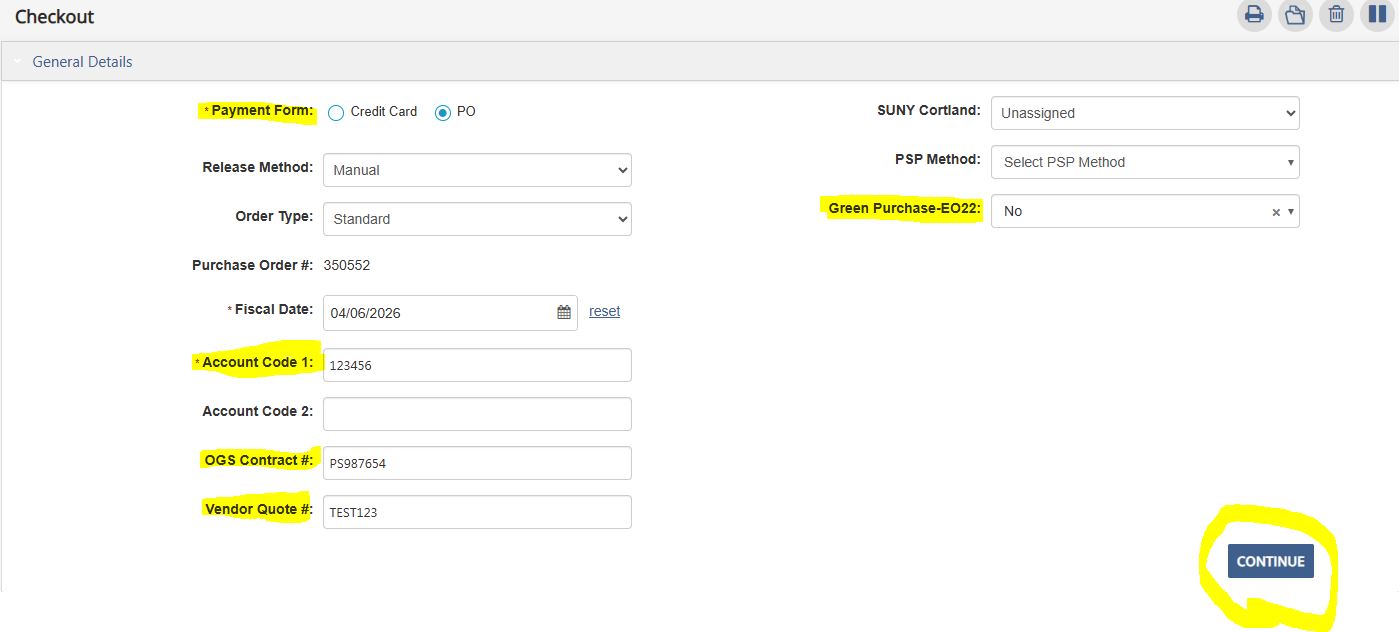
- General Details
- Select Payment Form (Credit Card or PO)
- Enter Account Code(s)
- Enter OGS Contract # (if applicable)
- Enter Vendor Quote # (if applicable)
- Green Purchase-EO22 - Select YES if this is a Green Procurement (for more information on Green Procurements, see https://www2.cortland.edu/offices/purchasing-office/notable-policies#green-procurement)
- Click Continue
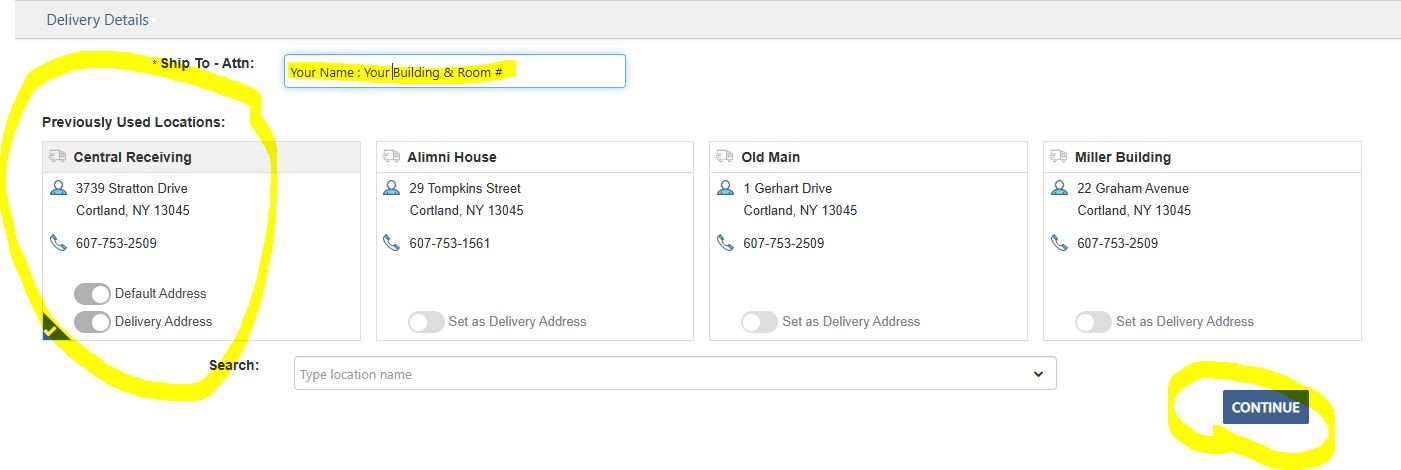
- Delivery Details
- Confirm or update:
- Ship-to location (default should be Central Receiving)
- Attention field - should be your name and building & room # for Central Receiving to deliver to
- Click Continue
- Confirm or update:
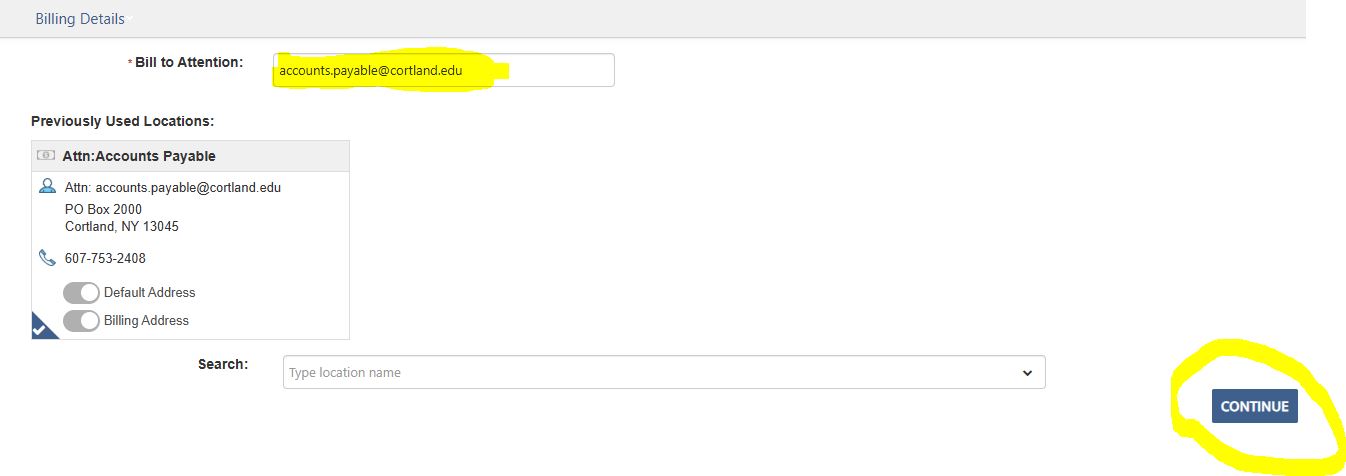
- Billing Details
- DO NOT CHANGE
- Must remain:
Accounts Payable
PO Box 2000
Cortland, NY 13045 - Click Continue
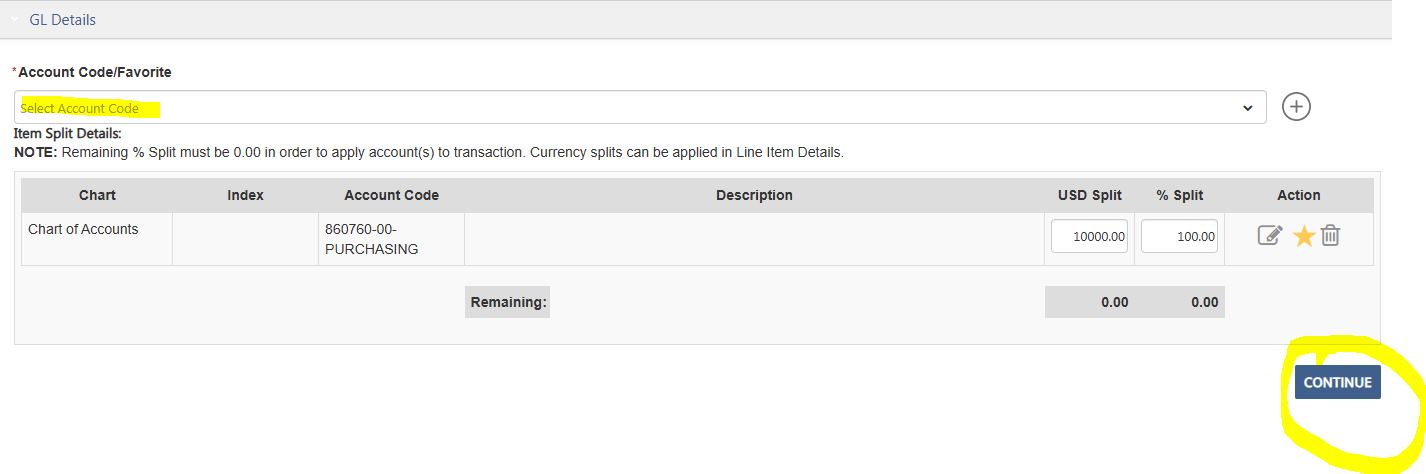
- GL Details
- Select or search for account
- Option to split funding (either by percent or dollar amount)
- Click Continue
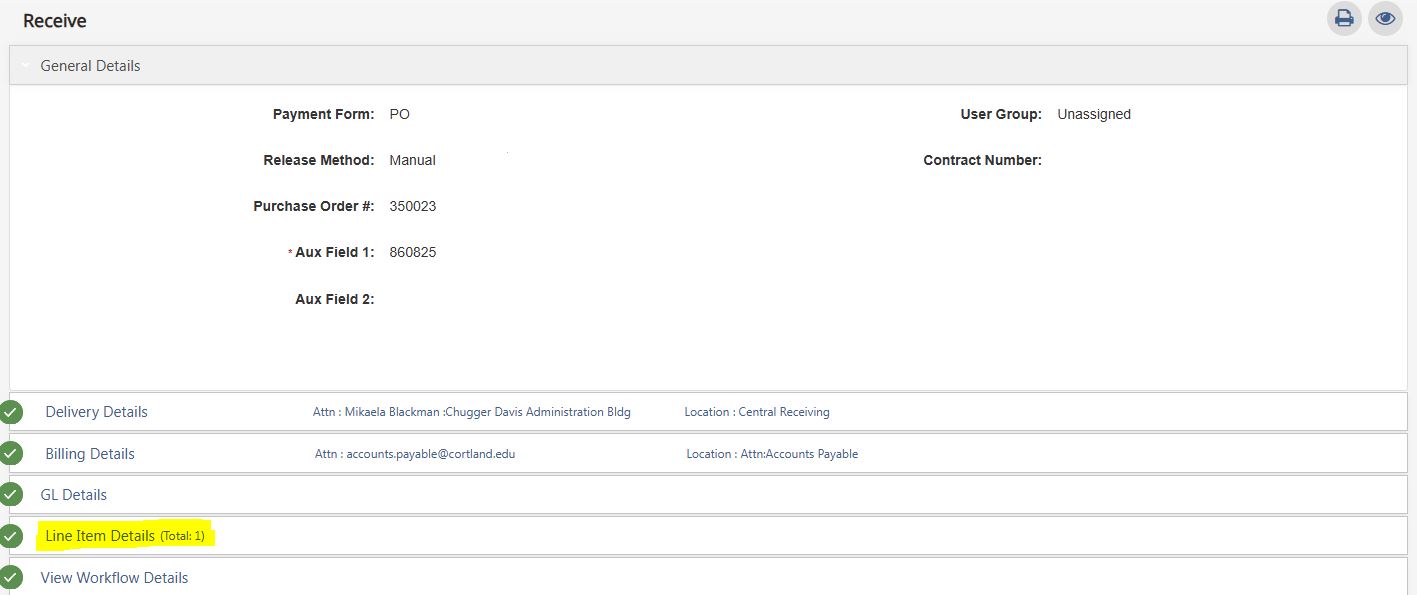
- Line Item Details
- View each item
- Apply split coding (if needed)
- Click Continue

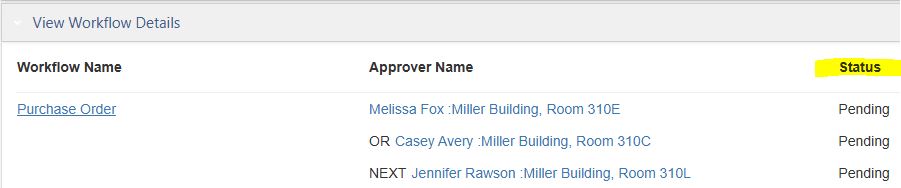
- Workflow
- Displays approval routing
- Statuses:
- Approved – Completed
- Active – Awaiting approval
- Pending – Not yet submitted
- Statuses:
- Displays approval routing
- Click Submit when ready.
Notes & Attachments
-
Add attachments using “Choose File” → Update
-
Add notes using note icon
-
Internal notes – for staff
-
External notes – sent to vendor
-

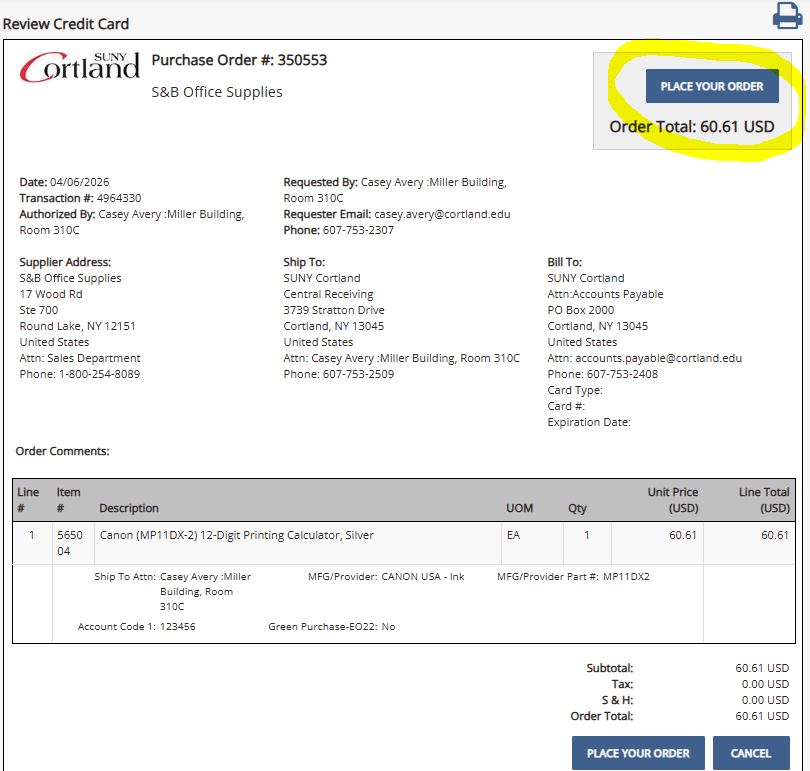
Checkout Buttons
- Print Order
- Archive Order
- Delete Transaction
-
Hold Order (finish later)

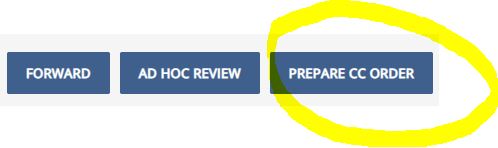
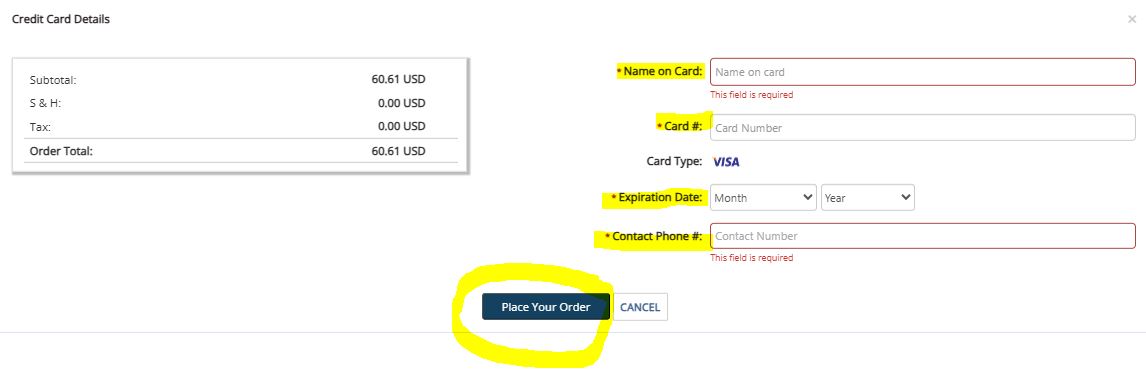
Finalizing P-Card Orders
-
Select Prepare CC Order
-
Enter:
-
Name on card
-
Card number
-
Expiration date
-
Contact phone number
-
-
Click Place Your Order
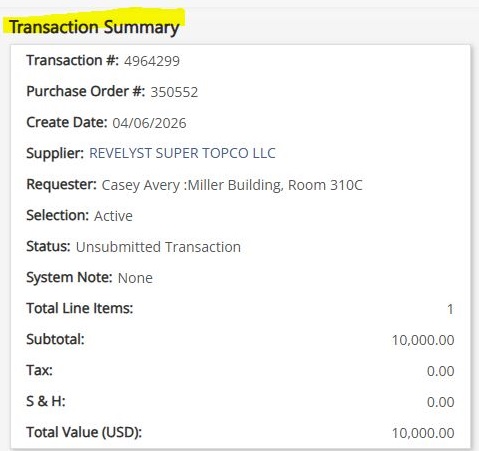
Transaction Summary
Key Tips & Best Practices
-
-
Always double-check Account Code(s)
-
Do not change billing address
-
Attach quotes for non-catalog orders (include ROPC for any orders $2,500 or more)
-
Enable pop-ups before using system
-
Monitor email for approvals and issues
-
Order Summary
The Order Summary feature allows you to quickly locate and review orders. Wile orders can also be accessed through the Receive tab, the Order Summary tool is often faster when searching for specific transactions.
Accessing Order Summary
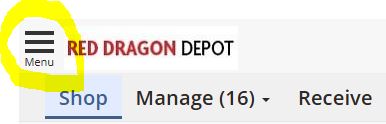
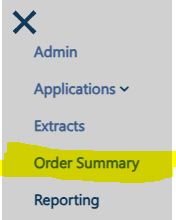
- Click the menu icon (three horizontal lines) in the top left navigation
- Select Order Summary
Using the Order Summary Page
Once opened, the Order Summary page allows you to:
- View a list of all orders
- Search for specific transactions
- Export order data
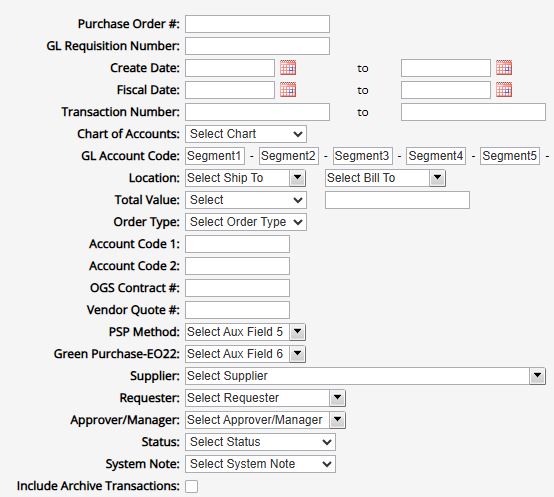
Search Options
You can filter results using multiple fields, including:
- Requestor name (enter your name to view all your orders or your predecessor's name to review their previous orders)
- Transaction details
- Other available search fields
This makes it easy to locate specific orders or review your purchasing history.
Viewing an Order
- Click the Transaction Number link on the left side (blue link)
- The order will open in a new window

From this screen, you can:
- View full order details
- Print the order
Exporting Data
- Select the Export option to download order data
- The report will be automatically sent to your email as an Excel spreadsheet
Approver Manual
Email Notifications
The system uses email to notify approvers of pending actions.
To ensure delivery:
- Emails come from: [email protected]
- Add this address to your contacts
- Check your spam/junk folder
Approving Orders: Login
- Go to the myRedDragon login page
- Select the Faculty/Staff tab
- Click “Red Dragon Depot (Purchasing)”
- A new window will open
Approval Process
- Select the Approve tab
- Locate orders awaiting approval
- Click on an order to open details
Available Actions
- Approve
- Moves order to next approver
- Reject
- Requires comments explaining reason
- Returns order to originator
- Ad Hoc Review
- Sends order to an additional reviewer
- Used when another department needs input
- Order returns to your queue afterward
Viewing an Order
When you open an order, you can review:
- Transaction Summary
- Line Item Details
- Notes & Attachments
- Account/GL Coding
Important:
- Attachments may appear:
- At the order level, or
- Within line item details
Always check both locations when reviewing documentation.
Having Trouble Finding an Order?
Instructions for your Approver:
- Click on the Approve tab and then click on Advanced Search.
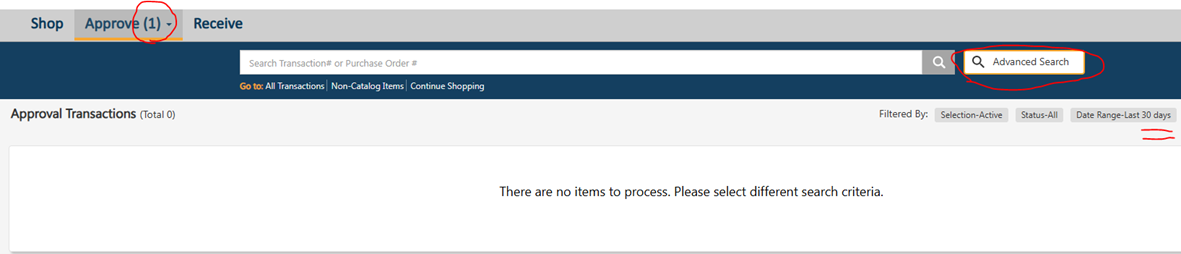
- For Date Range, select “Last 365 days” from the drop-down menu and then click Apply.
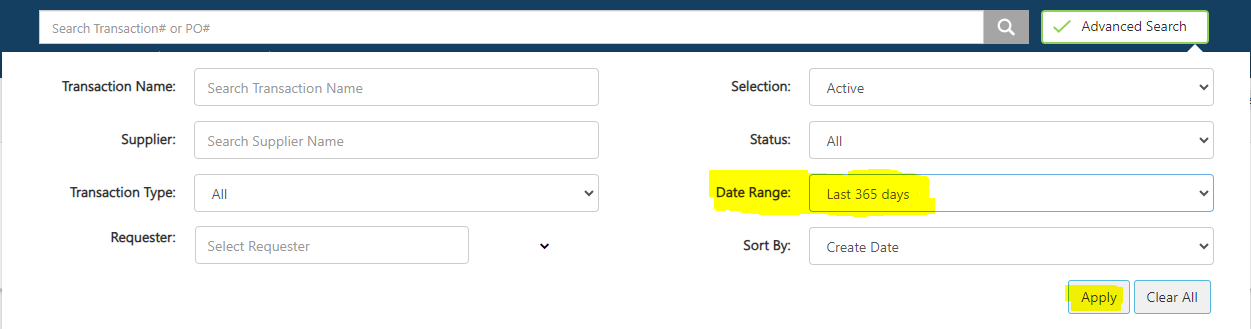
The Purchase Order (PO) should now appear in the results list.
Quick Tip
If the order still does not appear:
- Confirm the order has been submitted for approval
- Check if it is routed to another approver first (workflow)
What to Review Before Approval
- Accuracy of items/services
- Pricing and totals
- Supporting documentation (quotes, Reasonableness of Price Checklist for order $2,500 or more, etc.)
- Correct account coding
- Internal notes
Viewing Workflow
Workflow shows the approval path of an order.
How to View
- Click View Workflow Details within the order
Status Definitions
- Approved – Completed (includes date/time)
- Active – Awaiting approval
- Pending – Not yet in queue
Note:
Viewing workflow is optional and not required to approve an order.
Delegating Approval (When Absent)
You can assign a delegate to approve orders during your absence.
Steps- Go to your User Profile
- Select a Delegate from dropdown
- Set:
- Delegate Status = Active
-
Optional Start/End Dates
Important Reminders
- Set delegate status back to Inactive when you return
-
If no end date is set, delegation remains active
Support
- Contact Casey Avery (x2307) if:
- you need help setting a delegate
- the delegate is not listed
Best Practices for Approvers
- Review all attachments and notes carefully
- Verify account coding and funding sources
- Use Ad Hoc Review when cross-department approval is needed
- Provide clear comments when rejecting orders
- Set up a delegate before planned absences
Receiving Manual
Receiving in Red Dragon Depot (RDD) serves as your authorization for Accounts Payable to issue payment.
By completing receiving:
- You confirm goods/services were received satisfactorily
- Accounts Payable can match the invoice to the receiving record
- This process ensures compliance with New York State requirements
⚠️ All orders must be received in RDD — this is required for payment processing.
Types of Purchases
- Commodities (Tangible Goods)
- Receive when items are physically delivered
- Enter:
- Dollar amount, or
- Quantity received
- Services
(Examples: legal, medical, speakers, maintenance, inspections)- Receive when the service is fully completed and satisfactory
- Enter
- Dollar amount, or
-
Quantity
- Standing Orders
- Receive when an invoice or receipt is submitted
- Enter:
- Dollar amount from the invoice only
- Note: The system will track a running balance of the order
- Dollar amount from the invoice only
- Invoices (NOR Policy)
- If submitting an order with an attached invoice:
- You will receive an email: "Your order has been submitted to the supplier."
- At that time:
- Immediately receive the full dollar amount in RDD
- At that time:
- You will receive an email: "Your order has been submitted to the supplier."
- If submitting an order with an attached invoice:
- P-Card Orders
- Receive when goods are delivered
- Submit documentation with your P-Card Log to the P-Card Administrator
- (Do not send to Accounts Payable)
Steps to Receive Items
- Go to the Receive Tab
- Locate your Purchase Order (PO)
- Click anywhere on the order to expand it
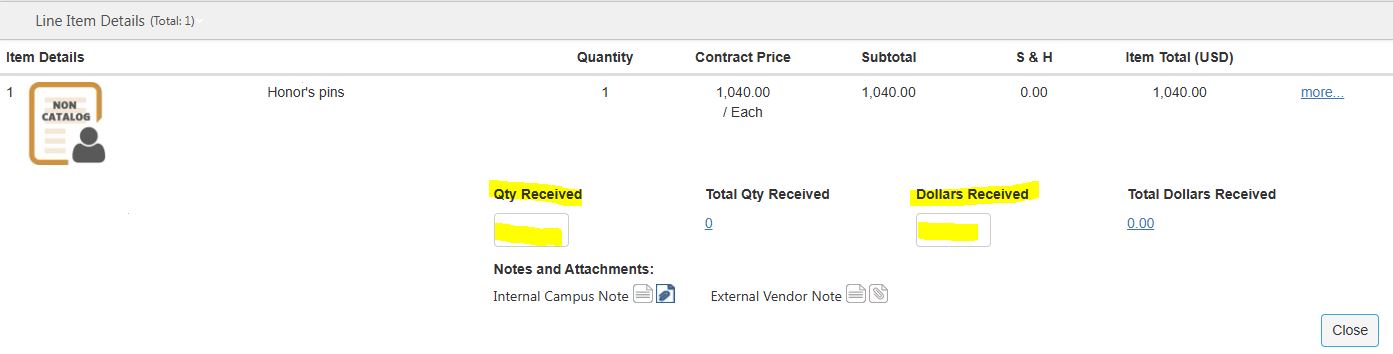
- Enter Receiving Information
- For each line item:
- Enter either:
- Dollars Received, or
- Quantity Received
- Enter either:
- For each line item:
-
Click Update
Special Instructions
- Standing Orders:
- Use Dollars Received only
- Enter the current invoice amount
- Partial Receiving:
- You may receive less than the full amount
- Continue receiving later when remaining items arrive
- Returns or Corrections:
- Enter a negative value to adjust prior receiving
Closing an Order
Once all items/services have been received:
- Click “Close Order”
- Select “Yes” to confirm
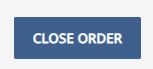
⚠️ Important Warning
- DO NOT click Close Order without entering receiving
- If done by mistake:
- Contact Purchasing (x2305 or x2307)
- The order can be reopened
After Closing
- The order is closed but still viewable
- Find it via:
- Order Summary, or
- Filter by All Closed
Best Practices
- Receive items promptly to avoid payment delays
- Double-check:
- Quantities
- Dollar amounts
- Always receive against every PO (your goal is to have your Receive tab empty, but don't receive anything you haven't actually received yet)
-
Keep documentation organized for audits